Swift Integration with Veryfi Lens: A Comprehensive GuideSwift Integration with Veryfi Lens: A Comprehensive Guide

May 1, 2023
7 mins read

With Swift programming language, you can easily integrate Veryfi Lens (AI Document Capture) to your iOS app and quickly extract data from receipts. Our step-by-step guide will help you create a simple app that utilizes Lens to scan an image of a document and display the extracted data on the screen.

Swift was developed by Apple as a replacement for the Objective-C language, which had been used for iOS and macOS app development for over 20 years. The name “Swift” was chosen because it represents speed and simplicity, two key features of the language. 

Swift was designed to be an open-source language from the start and anyone can contribute to the development of the language. Furthermore, there is a thriving community of developers who work on improving Swift and creating new libraries and frameworks.

Did you know..

The Swift logo is inspired by the mathematical concept of a “swiftlet,” a type of bird that builds its nest using swift and precise movements. The logo features a stylized bird in flight with its wings spread, which symbolizes the speed, agility, and precision of the Swift language.

The Swift team chose the logo because they wanted to convey the idea that Swift is a modern and dynamic programming language that is designed for speed and efficiency. It’s a fun and creative way to represent the language, and it also reflects the attention to detail and craftsmanship that goes into building software with Swift.

Before you begin

You will need:

  • Veryfi API keys
  • Lens: Cocoapods (iOS) username and password

(both are available from Settings within your Veryfi account)

Let’s get started

This swift guide is also available as a video on youtube.

1. Add Lens to your iOS project

1.1. Cocoapods repository

Add the Veryfi private Cocoapods repository as a source at the top of the Podfile & add Lens to your target. A sample Podfile should look like this:

Plain text
Copy to clipboard
Open code in new window
EnlighterJS 3 Syntax Highlighter
source 'https://repo.veryfi.com/shared/lens/veryfi-lens-podspec.git'
source 'https://github.com/CocoaPods/Specs.git'
target 'VeryfiLensExample' do
use_frameworks!
# Pods for VeryfiLensExample
pod 'VeryfiLens'
End
source 'https://repo.veryfi.com/shared/lens/veryfi-lens-podspec.git' source 'https://github.com/CocoaPods/Specs.git' target 'VeryfiLensExample' do use_frameworks! # Pods for VeryfiLensExample pod 'VeryfiLens' End
source 'https://repo.veryfi.com/shared/lens/veryfi-lens-podspec.git'
source 'https://github.com/CocoaPods/Specs.git'

target 'VeryfiLensExample' do
    use_frameworks!

    # Pods for VeryfiLensExample
    pod 'VeryfiLens'
End

1.2. Add your Cocoapods credentials using the git credential command in Terminal

Plain text
Copy to clipboard
Open code in new window
EnlighterJS 3 Syntax Highlighter
git credential approve <<EOF
protocol=https
host=repo.veryfi.com
path=shared/lens/veryfi-lens-podspec.git
username=USERNAME
password=PASSWORD
EOF
git credential approve <<EOF protocol=https host=repo.veryfi.com path=shared/lens/veryfi-lens-podspec.git username=USERNAME password=PASSWORD EOF
git credential approve <<EOF
protocol=https
host=repo.veryfi.com
path=shared/lens/veryfi-lens-podspec.git
username=USERNAME
password=PASSWORD

EOF

1.3. Install Lens by running this command in the Terminal, in the root folder of your project:

Plain text
Copy to clipboard
Open code in new window
EnlighterJS 3 Syntax Highlighter
pod install
pod install
pod install

2. Configuring your environment

Now that the Lens framework is installed, we can configure our project.

2.1. Add privacy descriptions

Open your Target > Info and add the following privacy descriptions

  • Privacy – Photo Library Additions Usage Description
  • Privacy – Photo Library Usage Description
  • Privacy – Location When In Use Usage Description
  • Privacy – Camera Usage Description

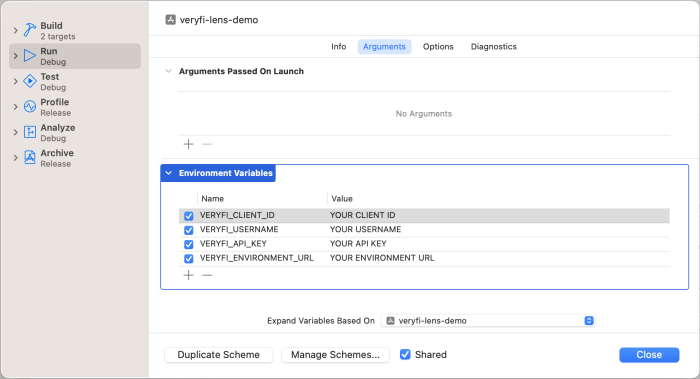
2.2. Add your Veryfi API credentials

Navigate to the top navigation bar, selecting Product > Scheme > Edit Scheme, and adding the following environment variables. You can find them on your Veryfi Hub account under Settings > Keys

XCode Swift Configuration for Swift Project

Now we can start making the app!

3. Making a simple app using Lens

Here’s what the final project directory will look like:

Xcode folder structure for a Swift demo project

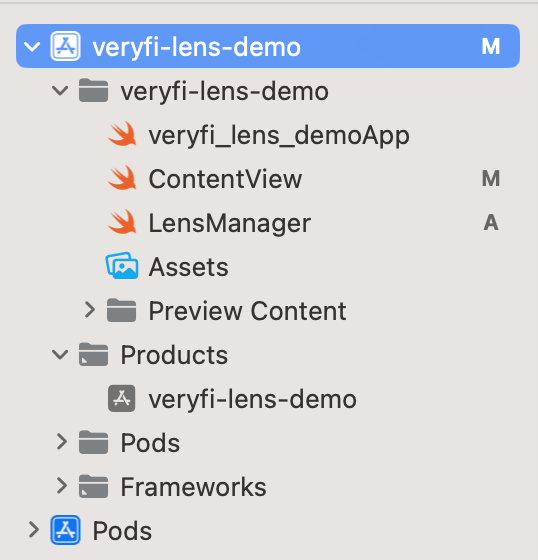
We’ll go through each Swift file one-at-a-time.

3.1. Lens Manager

Here is where we will handle all configuration and communication with Lens and the Veryfi Hub. We start by adding the following import statements at the top:

Plain text
Copy to clipboard
Open code in new window
EnlighterJS 3 Syntax Highlighter
import UIKit
import VeryfiLens
import UIKit import VeryfiLens
import UIKit
import VeryfiLens

(a) configure()

Inside Lens Manager, we create a function to configure Lens credentials and Veryfi settings.

Plain text
Copy to clipboard
Open code in new window
EnlighterJS 3 Syntax Highlighter
func configure() {
let CLIENT_ID = ProcessInfo.processInfo.environment["VERYFI_CLIENT_ID"]!
let AUTH_USERNAME = ProcessInfo.processInfo.environment["VERYFI_USERNAME"]!
let AUTH_APIKEY = ProcessInfo.processInfo.environment["VERYFI_API_KEY"]!
let URL = ProcessInfo.processInfo.environment["VERYFI_URL"]!
let credentials = VeryfiLensCredentials(clientId: CLIENT_ID,
username: AUTH_USERNAME,
apiKey: AUTH_APIKEY,
url: URL)
print(CLIENT_ID,AUTH_USERNAME,AUTH_APIKEY,URL)
let settings = VeryfiLensSettings()
settings.documentTypes = ["receipt"]
settings.showDocumentTypes = true
VeryfiLens.shared().configure(with: credentials, settings: settings)
}
func configure() { let CLIENT_ID = ProcessInfo.processInfo.environment["VERYFI_CLIENT_ID"]! let AUTH_USERNAME = ProcessInfo.processInfo.environment["VERYFI_USERNAME"]! let AUTH_APIKEY = ProcessInfo.processInfo.environment["VERYFI_API_KEY"]! let URL = ProcessInfo.processInfo.environment["VERYFI_URL"]! let credentials = VeryfiLensCredentials(clientId: CLIENT_ID, username: AUTH_USERNAME, apiKey: AUTH_APIKEY, url: URL) print(CLIENT_ID,AUTH_USERNAME,AUTH_APIKEY,URL) let settings = VeryfiLensSettings() settings.documentTypes = ["receipt"] settings.showDocumentTypes = true VeryfiLens.shared().configure(with: credentials, settings: settings) }
func configure() {
    let CLIENT_ID = ProcessInfo.processInfo.environment["VERYFI_CLIENT_ID"]!
    let AUTH_USERNAME = ProcessInfo.processInfo.environment["VERYFI_USERNAME"]!
    let AUTH_APIKEY = ProcessInfo.processInfo.environment["VERYFI_API_KEY"]!
    let URL = ProcessInfo.processInfo.environment["VERYFI_URL"]!
    
    let credentials = VeryfiLensCredentials(clientId: CLIENT_ID,
                                            username: AUTH_USERNAME,
                                            apiKey: AUTH_APIKEY,
                                            url: URL)
    print(CLIENT_ID,AUTH_USERNAME,AUTH_APIKEY,URL)
    
    let settings = VeryfiLensSettings()
    settings.documentTypes = ["receipt"]
    settings.showDocumentTypes = true
    VeryfiLens.shared().configure(with: credentials, settings: settings)
}

We first retrieve our Veryfi credentials from our environment variables and create a VeryfiLensCredentials struct.

Next, we do something similar and create an instance of VeryfiLensSettings.This is optional, but we can set documentTypes and showDocumentTypes to force Veryfi to label all of our documents as “receipts.” There are many more settings available, and you can view our Mobile Docs for iOS on the Veryfi Hub for more information.

Finally, we pass both our credentials and settings to Veryfi Lens using the VeryfiLens.shared().configure() function.

(b) showCamera()

Now we’ll create another function in Lens Manager to show the camera once the view loads. The VeryfiLens.shared().showCamera() function takes a View Controller, so we’ll wrap it in a function to get the current View Controller first and pass it as a parameter.

Plain text
Copy to clipboard
Open code in new window
EnlighterJS 3 Syntax Highlighter
func showCamera() {
if let rootViewController = UIApplication.shared.currentUIWindow()?.rootViewController {
VeryfiLens.shared().showCamera(in: rootViewController)
}
}
func showCamera() { if let rootViewController = UIApplication.shared.currentUIWindow()?.rootViewController { VeryfiLens.shared().showCamera(in: rootViewController) } }
func showCamera() {
    if let rootViewController = UIApplication.shared.currentUIWindow()?.rootViewController {
        VeryfiLens.shared().showCamera(in: rootViewController)
    }
}

To get the current ViewController, we’ll use an extension function called currentUIWindow(). You can either create this in the same file or a different one, but it just gets the active scenes, converts them to UIWindowScenes and gets the key window.

Plain text
Copy to clipboard
Open code in new window
EnlighterJS 3 Syntax Highlighter
extension UIApplication {
func currentUIWindow() -> UIWindow? {
let connectedScenes = UIApplication.shared.connectedScenes
.filter { $0.activationState == .foregroundActive }
.compactMap { $0 as? UIWindowScene }
let window = connectedScenes.first?
.windows
.first { $0.isKeyWindow }
return window
}
}
extension UIApplication { func currentUIWindow() -> UIWindow? { let connectedScenes = UIApplication.shared.connectedScenes .filter { $0.activationState == .foregroundActive } .compactMap { $0 as? UIWindowScene } let window = connectedScenes.first? .windows .first { $0.isKeyWindow } return window } }
extension UIApplication {
    func currentUIWindow() -> UIWindow? {
        let connectedScenes = UIApplication.shared.connectedScenes
            .filter { $0.activationState == .foregroundActive }
            .compactMap { $0 as? UIWindowScene }
        
        let window = connectedScenes.first?
            .windows
            .first { $0.isKeyWindow }
        
        return window
    }
}

(c) setDelegate()

The final portion of our Lens Manager is to create a function to set the Veryfi Lens delegates. Veryfi Lens communicates through a VeryfiLensDelegate struct, which calls a different function for a set of four events: close, update, success, or error.

First, we’ll create a variable called eventListener to store a function the delegate will eventually perform for our events. This function will take a JSON parameter:

Plain text
Copy to clipboard
Open code in new window
EnlighterJS 3 Syntax Highlighter
var eventListener: ((_ json: [String : Any]) -> Void)?

Next, we’ll create an extension of our LensManager for a VeryfiLensDelegate struct.

Plain text
Copy to clipboard
Open code in new window
EnlighterJS 3 Syntax Highlighter
extension LensManager: VeryfiLensDelegate {
func veryfiLensClose(_ json: [String : Any]) {
eventListener?(json)
}
func veryfiLensError(_ json: [String : Any]) {
eventListener?(json)
}
func veryfiLensSuccess(_ json: [String : Any]) {
eventListener?(json)
}
func veryfiLensUpdate(_ json: [String : Any]) {
eventListener?(json)
}
}
extension LensManager: VeryfiLensDelegate { func veryfiLensClose(_ json: [String : Any]) { eventListener?(json) } func veryfiLensError(_ json: [String : Any]) { eventListener?(json) } func veryfiLensSuccess(_ json: [String : Any]) { eventListener?(json) } func veryfiLensUpdate(_ json: [String : Any]) { eventListener?(json) } }
extension LensManager: VeryfiLensDelegate {
    func veryfiLensClose(_ json: [String : Any]) {
        eventListener?(json)
    }
    func veryfiLensError(_ json: [String : Any]) {
        eventListener?(json)
    }
    func veryfiLensSuccess(_ json: [String : Any]) {
        eventListener?(json)
    }
    func veryfiLensUpdate(_ json: [String : Any]) {
        eventListener?(json)
    }
}

Every time a close, open, success, or update event occurs, Veryfi Lens will call the corresponding function which will perform that generic eventListener function.

Here is the fully assembled Lens Manager file:

Plain text
Copy to clipboard
Open code in new window
EnlighterJS 3 Syntax Highlighter
import UIKit
import VeryfiLens
class LensManager {
func configure() {
let CLIENT_ID = ProcessInfo.processInfo.environment["VERYFI_CLIENT_ID"]!
let AUTH_USERNAME = ProcessInfo.processInfo.environment["VERYFI_USERNAME"]!
let AUTH_APIKEY = ProcessInfo.processInfo.environment["VERYFI_API_KEY"]!
let URL = ProcessInfo.processInfo.environment["VERYFI_URL"]!
let credentials = VeryfiLensCredentials(clientId: CLIENT_ID,
username: AUTH_USERNAME,
apiKey: AUTH_APIKEY,
url: URL)
print(CLIENT_ID,AUTH_USERNAME,AUTH_APIKEY,URL)
let settings = VeryfiLensSettings()
settings.documentTypes = ["receipt"]
settings.showDocumentTypes = true
VeryfiLens.shared().configure(with: credentials, settings: settings)
}
func showCamera() {
if let rootViewController = UIApplication.shared.currentUIWindow()?.rootViewController {
VeryfiLens.shared().showCamera(in: rootViewController)
}
}
var eventListener: ((_ json: [String : Any]) -> Void)?
func setDelegate(eventListener: @escaping ((_ json: [String : Any]) -> Void)) {
self.eventListener = eventListener
VeryfiLens.shared().delegate = self
}
}
extension UIApplication {
func currentUIWindow() -> UIWindow? {
let connectedScenes = UIApplication.shared.connectedScenes
.filter { $0.activationState == .foregroundActive }
.compactMap { $0 as? UIWindowScene }
let window = connectedScenes.first?
.windows
.first { $0.isKeyWindow }
return window
}
}
extension LensManager: VeryfiLensDelegate {
func veryfiLensClose(_ json: [String : Any]) {
eventListener?(json)
}
func veryfiLensError(_ json: [String : Any]) {
eventListener?(json)
}
func veryfiLensSuccess(_ json: [String : Any]) {
eventListener?(json)
}
func veryfiLensUpdate(_ json: [String : Any]) {
eventListener?(json)
}
}
import UIKit import VeryfiLens class LensManager { func configure() { let CLIENT_ID = ProcessInfo.processInfo.environment["VERYFI_CLIENT_ID"]! let AUTH_USERNAME = ProcessInfo.processInfo.environment["VERYFI_USERNAME"]! let AUTH_APIKEY = ProcessInfo.processInfo.environment["VERYFI_API_KEY"]! let URL = ProcessInfo.processInfo.environment["VERYFI_URL"]! let credentials = VeryfiLensCredentials(clientId: CLIENT_ID, username: AUTH_USERNAME, apiKey: AUTH_APIKEY, url: URL) print(CLIENT_ID,AUTH_USERNAME,AUTH_APIKEY,URL) let settings = VeryfiLensSettings() settings.documentTypes = ["receipt"] settings.showDocumentTypes = true VeryfiLens.shared().configure(with: credentials, settings: settings) } func showCamera() { if let rootViewController = UIApplication.shared.currentUIWindow()?.rootViewController { VeryfiLens.shared().showCamera(in: rootViewController) } } var eventListener: ((_ json: [String : Any]) -> Void)? func setDelegate(eventListener: @escaping ((_ json: [String : Any]) -> Void)) { self.eventListener = eventListener VeryfiLens.shared().delegate = self } } extension UIApplication { func currentUIWindow() -> UIWindow? { let connectedScenes = UIApplication.shared.connectedScenes .filter { $0.activationState == .foregroundActive } .compactMap { $0 as? UIWindowScene } let window = connectedScenes.first? .windows .first { $0.isKeyWindow } return window } } extension LensManager: VeryfiLensDelegate { func veryfiLensClose(_ json: [String : Any]) { eventListener?(json) } func veryfiLensError(_ json: [String : Any]) { eventListener?(json) } func veryfiLensSuccess(_ json: [String : Any]) { eventListener?(json) } func veryfiLensUpdate(_ json: [String : Any]) { eventListener?(json) } }
import UIKit
import VeryfiLens

class LensManager {
    func configure() {
        let CLIENT_ID = ProcessInfo.processInfo.environment["VERYFI_CLIENT_ID"]!
        let AUTH_USERNAME = ProcessInfo.processInfo.environment["VERYFI_USERNAME"]!
        let AUTH_APIKEY = ProcessInfo.processInfo.environment["VERYFI_API_KEY"]!
        let URL = ProcessInfo.processInfo.environment["VERYFI_URL"]!
        
        let credentials = VeryfiLensCredentials(clientId: CLIENT_ID,
                                                username: AUTH_USERNAME,
                                                apiKey: AUTH_APIKEY,
                                                url: URL)
        print(CLIENT_ID,AUTH_USERNAME,AUTH_APIKEY,URL)
        
        let settings = VeryfiLensSettings()
        settings.documentTypes = ["receipt"]
        settings.showDocumentTypes = true
        VeryfiLens.shared().configure(with: credentials, settings: settings)
    }
    
    func showCamera() {
        if let rootViewController = UIApplication.shared.currentUIWindow()?.rootViewController {
            VeryfiLens.shared().showCamera(in: rootViewController)
        }
    }
    
    var eventListener: ((_ json: [String : Any]) -> Void)?
    func setDelegate(eventListener: @escaping ((_ json: [String : Any]) -> Void)) {
        self.eventListener = eventListener
        VeryfiLens.shared().delegate =  self
    }
}
extension UIApplication {
    func currentUIWindow() -> UIWindow? {
        let connectedScenes = UIApplication.shared.connectedScenes
            .filter { $0.activationState == .foregroundActive }
            .compactMap { $0 as? UIWindowScene }
        
        let window = connectedScenes.first?
            .windows
            .first { $0.isKeyWindow }
        
        return window
    }
}
extension LensManager: VeryfiLensDelegate {
    func veryfiLensClose(_ json: [String : Any]) {
        eventListener?(json)
        
    }
    func veryfiLensError(_ json: [String : Any]) {
        eventListener?(json)
    }
    func veryfiLensSuccess(_ json: [String : Any]) {
        eventListener?(json)
    }
    func veryfiLensUpdate(_ json: [String : Any]) {
        eventListener?(json)
    }
}

3.2. Content View

This is where we put our main content view.

Plain text
Copy to clipboard
Open code in new window
EnlighterJS 3 Syntax Highlighter
import SwiftUI
import VeryfiLens
struct LensConsoleView: View {
var lensManager = LensManager()
@State var lensEvents: [String] = []
var body: some View {
VStack {
Text(lensEvents.isEmpty ? "Tap the button to try out Lens!" : "Lens Console")
.bold(!lensEvents.isEmpty)
List {
ForEach(0..<lensEvents.count, id: \.self) { each in
Text(lensEvents[each])
}
}
.frame(maxWidth: .infinity, maxHeight: .infinity)
Button("Launch Veryfi Lens") {
lensManager.setDelegate(eventListener: eventListener)
lensManager.configure()
lensManager.showCamera()
}
.buttonStyle(.borderedProminent)
.padding(EdgeInsets(top: 10, leading: 0, bottom: 0, trailing: 0))
}
.frame(maxWidth: .infinity, maxHeight: .infinity)
.padding(EdgeInsets(top: 20, leading: 0, bottom: 20, trailing: 0))
}
func eventListener(_ json: [String : Any]) -> Void {
if let string = string(from: json) {
lensEvents.append(string)
}
}
func string(from json: [String : Any]) -> String? {
guard let jsonData = try? JSONSerialization.data(withJSONObject: json as Any, options: .prettyPrinted) else { return nil }
return String(data: jsonData, encoding: .utf8)
}
}
import SwiftUI import VeryfiLens struct LensConsoleView: View { var lensManager = LensManager() @State var lensEvents: [String] = [] var body: some View { VStack { Text(lensEvents.isEmpty ? "Tap the button to try out Lens!" : "Lens Console") .bold(!lensEvents.isEmpty) List { ForEach(0..<lensEvents.count, id: \.self) { each in Text(lensEvents[each]) } } .frame(maxWidth: .infinity, maxHeight: .infinity) Button("Launch Veryfi Lens") { lensManager.setDelegate(eventListener: eventListener) lensManager.configure() lensManager.showCamera() } .buttonStyle(.borderedProminent) .padding(EdgeInsets(top: 10, leading: 0, bottom: 0, trailing: 0)) } .frame(maxWidth: .infinity, maxHeight: .infinity) .padding(EdgeInsets(top: 20, leading: 0, bottom: 20, trailing: 0)) } func eventListener(_ json: [String : Any]) -> Void { if let string = string(from: json) { lensEvents.append(string) } } func string(from json: [String : Any]) -> String? { guard let jsonData = try? JSONSerialization.data(withJSONObject: json as Any, options: .prettyPrinted) else { return nil } return String(data: jsonData, encoding: .utf8) } }
import SwiftUI
import VeryfiLens

struct LensConsoleView: View {
    var lensManager = LensManager()
    @State var lensEvents: [String] = []
    
    var body: some View {
        VStack {
            Text(lensEvents.isEmpty ? "Tap the button to try out Lens!" : "Lens Console")
                .bold(!lensEvents.isEmpty)
            List {
                ForEach(0..<lensEvents.count, id: \.self) { each in
                    Text(lensEvents[each])
                }
            }
            .frame(maxWidth: .infinity, maxHeight: .infinity)
            Button("Launch Veryfi Lens") {
                lensManager.setDelegate(eventListener: eventListener)
                lensManager.configure()
                lensManager.showCamera()
            }
            .buttonStyle(.borderedProminent)
            .padding(EdgeInsets(top: 10, leading: 0, bottom: 0, trailing: 0))
        }
        .frame(maxWidth: .infinity, maxHeight: .infinity)
        .padding(EdgeInsets(top: 20, leading: 0, bottom: 20, trailing: 0))
    }
    
    func eventListener(_ json: [String : Any]) -> Void {
        if let string = string(from: json) {
            lensEvents.append(string)
        }
    }
    
    func string(from json: [String : Any]) -> String? {
        guard let jsonData = try? JSONSerialization.data(withJSONObject: json as Any, options: .prettyPrinted) else { return nil }
        return String(data: jsonData, encoding: .utf8)
    }
}

We start by importing SwiftUI and VeryfiLens.

We also create an instance of our LensManager() and a list of strings where we’ll store the JSON of our Veryfi Lens events.

In our View Stack, we have either text prompting the user to try out Lens if they haven’t opened it already, or a list of our Lens events.

Next, we have a button that calls our Lens Manager functions. It sets the delegate, configures our credentials, and then shows the Lens Camera.

Finally, we can talk about the event listener function we’re setting when the button is pressed.
All it does is take the raw JSON from the VeryfiLensDelegate, turn it into a pretty-printed string using the string() function, and add it to our list of Lens events which we’ll display on the screen.

3.3. App File

For our app file, all we have to do is add our ContentView() and we’re done!

Plain text
Copy to clipboard
Open code in new window
EnlighterJS 3 Syntax Highlighter
import SwiftUI
@main
struct veryfi_lens_demoApp: App {
var body: some Scene {
WindowGroup {
ContentView()
}
}
}
import SwiftUI @main struct veryfi_lens_demoApp: App { var body: some Scene { WindowGroup { ContentView() } } }
import SwiftUI

@main
struct veryfi_lens_demoApp: App {
    var body: some Scene {
        WindowGroup {
            ContentView()
        }
    }
}

4. Done!

Congratulations, you’ve just unlocked a powerful new ability that will amaze your end users.

With your newly acquired skills, you can build and load your Veryfi Lens Swift project onto your iOS device. Once you give it a try, you’ll see how effortless it is to extract data from receipts in a snap.

Just imagine the look on your end user’s faces when they see your impressive project in action. With the ability to quickly and accurately extract data, you’ll become a superhero in their eyes.

So, don’t wait any longer, it’s time to start building with the Veryfi Lens SDK. With this powerful tool in your arsenal, you’re sure to impress and make a lasting impact.

Happy coding!

Psst… did you know?

Swift also has some fun features built into the language, such as the ability to use emojis as variable and function names. For example, you could write a function called “🤖🚀🌎” in Swift, which would be perfectly valid code!

A Big Thank you to Matt Eng for this great write up!

Veryfi SDKsVeryfi SDKs

Showing 53 SDK cards

Kotlin

veryfi-android

Android kotlin module for communicating with the Veryfi OCR API

C#

veryfi-csharp

This is the official C# client library for communicating with the Veryfi OCR API. || read: https://veryfi.com/csharp

Dart

veryfi-dart

Dart module for communicating with the Veryfi OCR API

HTML

veryfi-docs

All documentation related to Veryfi API

HTML

veryfi-docs-v2

Dynamic documentation

Go

veryfi-go

Go module for communicating with the Veryfi OCR API.

Java

veryfi-java

Java module for communicating with the Veryfi OCR API.

Kotlin

veryfi-kotlin

Kotlin Library for communicating with the Veryfi OCR API

JavaScript

veryfi-nodejs

Node.js module for communicating with the Veryfi OCR API. || read: https://veryfi.com/nodejs

PHP

veryfi-php

PHP module for communicating with the Veryfi OCR API.

Python

veryfi-python

Python module for communicating with the Veryfi OCR API.

Ruby

veryfi-ruby

Ruby gem for communicating with the Veryfi OCR API.

Rust

veryfi-rust

Rust module for communicating with the Veryfi OCR API

Swift

veryfi-swift

Swift framework for communicating with the Veryfi OCR API

Kotlin

veryfi-lens-bank-statements-android-demo

Example about how to user Veryfi Lens for Bank Statements

Swift

veryfi-lens-bank-statements-ios-demo

Example about how to use Veryfi Lens

Kotlin

veryfi-lens-barcodes-android-demo

Example about how to user Veryfi Lens for Barcodes

Swift

veryfi-lens-barcodes-ios-demo

Example about how to user Veryfi Lens for Barcodes

Kotlin

veryfi-lens-business-cards-android-demo

Example codes about how to use Veryfi Lens SDKs

Swift

veryfi-lens-business-cards-ios-demo

Example codes about how to use Veryfi Lens SDKs

Kotlin

veryfi-lens-checks-android-demo

Example codes about how to use Veryfi Lens SDKs

Swift

veryfi-lens-checks-ios-demo

Example codes about how to use Veryfi Lens SDKs

Vue

veryfi-lens-cordova-demo

Example codes about how to use Veryfi Lens SDKs

Kotlin

veryfi-lens-credit-cards-android-demo

Example codes about how to use Veryfi Lens SDKs

Swift

veryfi-lens-credit-cards-ios-demo

Example codes about how to use Veryfi Lens SDKs

JavaScript

veryfi-lens-demo-vanillajs

null

Dart

veryfi-lens-flutter-demo

Example Demo App about how to use our Flutter wrapper

Kotlin

veryfi-lens-headless-credit-cards-android-demo

Example codes about how to use Veryfi Lens SDKs

Swift

veryfi-lens-headless-credit-cards-ios-demo

Example codes about how to use Veryfi Lens SDKs

Kotlin

veryfi-lens-headless-receipts-android-demo

Example codes about how to use Veryfi Lens SDKs

Swift

veryfi-lens-headless-receipts-ios-demo

Example codes about how to use Veryfi Lens SDKs

TypeScript

veryfi-lens-ionic-capacitor-demo

Example codes about how to use Veryfi Lens SDKs

Kotlin

veryfi-lens-long-receipts-android-demo

Example codes about how to use Veryfi Lens SDKs

Swift

veryfi-lens-long-receipts-ios-demo

Example codes about how to use Veryfi Lens SDKs

C#

veryfi-lens-net-demo

Veryfi Lens Demo for .NET

Kotlin

veryfi-lens-ocr-android-demo

Veryfi Lens OCR to read codes, numbers and short text

Swift

veryfi-lens-ocr-ios-demo

Example project about how to use Veryfi Lens OCR SDK

TypeScript

veryfi-lens-react-native-demo

Example Demo App about how to use our react native wrapper

TypeScript

veryfi-lens-react-native-expo-demo

Example Demo App about how to use our react native wrapper

Kotlin

veryfi-lens-receipts-android-demo

Example codes about how to use Veryfi Lens SDKs

Swift

veryfi-lens-receipts-ios-demo

Example codes about how to use Veryfi Lens SDKs

JavaScript

veryfi-lens-socket

Lens for Browser socket sdk

Swift

veryfi-lens-swiftui-ios-demo

Veryfi Lens example about how to user our Lens SDK inside a SwiftUI iOS project

Kotlin

veryfi-lens-w2-android-demo

Example codes about how to use Veryfi Lens SDKs

Swift

veryfi-lens-w2-ios-demo

Example codes about how to use Veryfi Lens SDKs

Kotlin

veryfi-lens-w9-android-demo

Example codes about how to use Veryfi Lens SDKs

Swift

veryfi-lens-w9-ios-demo

Example codes about how to use Veryfi Lens SDKs

JavaScript

veryfi-lens-wasm

null

JavaScript

veryfi-lens-web-demo-angular

Veryfi Lens for Web Demo Angular App

JavaScript

veryfi-lens-web-demo-express

Veryfi Lens for Web SDK Demo

TypeScript

veryfi-lens-web-demo-react

Veryfi Lens for Web Demo React App

JavaScript

veryfi-lens-web-demo-svelte

null

C#

veryfi-lens-xamarin-demo

Example codes about how to use Veryfi Lens SDKs