Looking for a way to change the vendor on your documents or manage your vendor list? You’re at the right place.
The following instructions take place inside the Veryfi web app (hub) located here: https://hub.veryfi.com
How to Change or Update Vendor
- Go to your DOCUMENTS https://hub.veryfi.com/documents/
- Open the Document you want to alter the vendor for by pressing VIEW button (a modal window will open the Document detail)
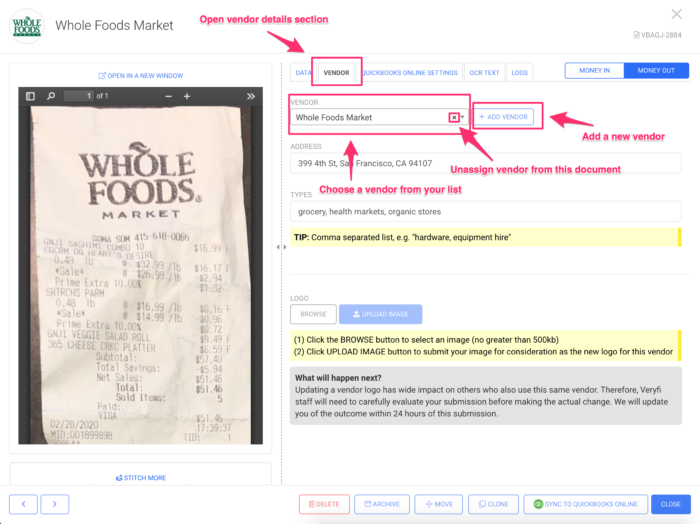
- Inside the detail view, click the VENDOR tab
- Click on the Vendor dropdown to choose the Vendor from your list of existing vendors. (as shown in the screenshot below)
- ADDRESS and TYPES fields are also editable, feel free to adjust if needed
- If you’d like to unassign a vendor from your document, click the little “x” icon at the right of the vendor dropdown (as shown in screenshot below).
Make sure to return to the document later and assign the correct vendor later. - You can also click the ADD VENDOR button to add a vendor to your list and automatically apply this new vendor to this document.

Change, remove, add new vendor directly from document details
Note: There’s no need to look for a SAVE button. All fields save automatically.
How to Update Vendor Details – Alternative Method
- Go to your VENDORS page https://hub.veryfi.com/vendors/
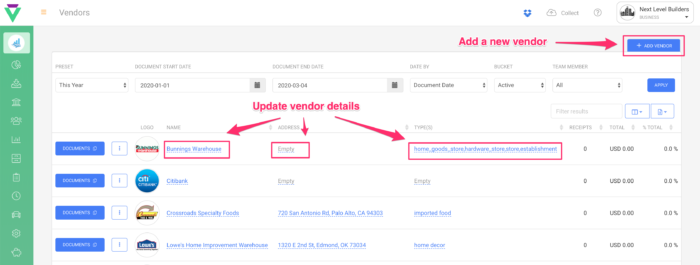
- Click the field you’d like to change within either the NAME, ADDRESS or TYPES column
- Update the field
- Press the Enter or Return key on your keyboard

Add a new vendor or update an existing one
How to Add a New Vendor – Alternative Method
- Go to your VENDORS page https://hub.veryfi.com/vendors/
- Click the ADD VENDOR button in the top-right corner
- Fill out all the relevant details
- Click ADD VENDOR when ready
Once the new vendor is created it should be added to the list for your existing vendors and should be available both via web app (https://hub.veryfi.com/vendors/) and mobile app.


